How to apply platform update on local VM or development VM Dynamics 365 for Finance and Operations

Scenario: We were using dev environment of Dynamics Finance and Operations with Application release version 10.0 platform update 24. Microsoft released a new version 10.0.5 with platform update 26.

Now we have two options to use the new version.

  1.  Download new VM and moved the custom models to the newly created VM
  2. upgrade the current VM on the latest update

In first option we need to create and setup the testing data again to test the code.

2nd option everything will remain same and no extra effort needed other than the applying update.

Definitely we selected the 2nd option and below steps were performed to update the environment.

Steps:

  • Download the latest release package from the asset library to the local VM development environment
  • Unzip the zip file to the local VM in C drive by creating a custom folder (folder should not be in the users folder directory). I created  with below name FnO10.0.234.10001App
  • Stop the following services (Batch, Data import and IIS)
  • Close Visual studio instances
  • open command prompt as administrator
  • set the directory to your custom folder contains the unzip files
    • C:\FnO10.0.234.10001App>
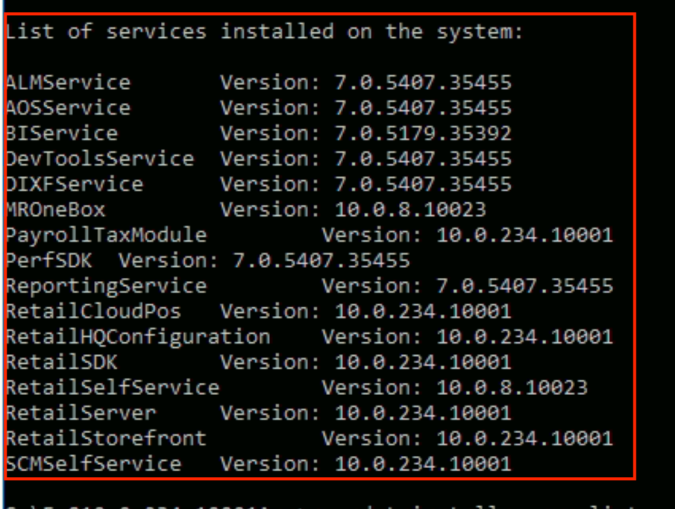
  • Run the below command to check the list of components installed
    • C:\FnO10.0.234.10001App>AxUpdateInstaller.exe list
  • From the above command you will get all the components already installedCommponents versions before update.png
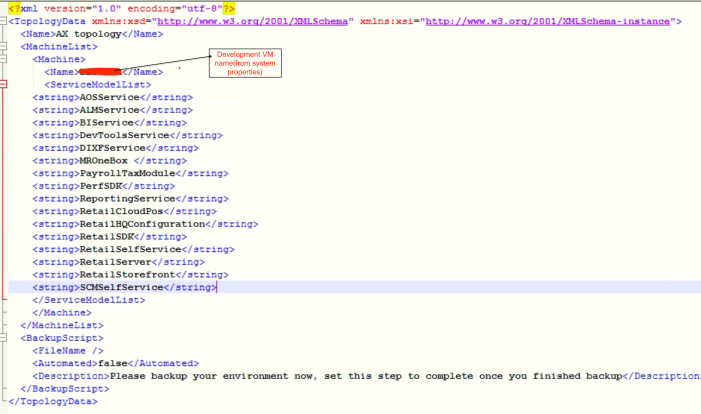
  • update the DefaultTopologyData.xml file located in the update folder in my case located in below location
    • FnO10.0.234.10001App -> DefaultTopologyData.xml


  • Best way to update this file copy on another location edit like below and replace in the above folderDefaultTopologyData file.png


  • Generate the run book thru command prompt using below command
    • Actual command: AXUpdateInstaller.exe generate -runbookid=[runbookID] -topologyfile=[topologyFile] -servicemodelfile=[serviceModelFile] -runbookfile=[runbookFile]
    • [runbookID]– A parameter that is specified by the developer who applies the deployable package.
    • [topologyFile]– The path of the DefaultTopologyData.xml file.
    • [serviceModelFile]– The path of the DefaultServiceModelData.xml file.
    • [runbookFile]– The name of the runbook file to generate (for example, AOSRunbook.xml).
    • Should be modify as below
    • AXUpdateInstaller.exe generate -runbookid=”Dev-runbook” -topologyfile=”DefaultTopologyData.xml -servicemodelfile=”DefaultServiceModelData.xml” -runbookfile=”Dev-runbook.xml”


  • Import the run thru command prompt using below command
    • AXUpdateInstaller.exe import -runbookfile=”Dev-runbook.xml”


  • Execute the runbook thru command prompt using below command
    • AXUpdateInstaller.exe execute -runbookid=”Dev-runbook”

runbook execute.png

This step is the longest step involving many sub-steps performed during this step.

Some steps even takes 2,3 or may more hours. please make sure system will not logout neither shutdown.

if any step fails during this step use below command to rerun

For me its fails on 19 step

runbook step rerun.png


Wait till last step completed


runbook execution complete.png


  • Verify the installation by running below command
    • AXUpdateInstaller.exe list

updated version list.png

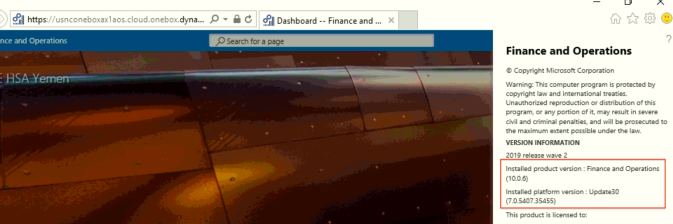
You can check the version also by login to the dynamics browser about option.


Screen Shot 2019-11-26 at 11.37.19 AM.png


Please leave comment in the comments section if you are facing any issue while updating. I will try to assist.


Good luck!!!


Uninstall a deployable package from sandbox(UAT) environment or production- Dynamics 365 for Finance and Operations

Scenario: Sometime we need to uninstall a deployable package from the UAT or Production environment.


Solution:

Below are the steps that need to be performed to uninstall a package.


  • Create a deployable package using visual studio or Build server
  • Do not extract the deployable package that is in ZIP folder (If you extract the zip folder you will face issue invalid HotfixInstallationInfo.xml file)
  • Just open the deployable package zip folder
  • Go to Deployable package zip folder -> AOS service -> Scripts folder
  • create a text file name ‘ModuleToRemove’
  • Write the module name to be removed in the the ModuleToRemove file

Screen Shot 2019-11-23 at 9.10.48 PM


  •  If you have multiple models to remove then write mode name per line as below
    • Model1
    • Model2
    • Model3
  • Note: In multiple models removing write the models name in sequence as per dependency sequence
  • Go back to main zip folder and find the file HotfixInstallationInfo.xml ,copy the file to some other location and edit the file like below

<MetadataModuleList>
</MetadataModuleList>


<AllComponentList>
<ArrayOfString>
</ArrayOfString>
</AllComponentList>

  • Edit the file should be same as above.
  • Copy and replace the HotfixInstallationInfo.xml file in the deployable folder
  • upload the file in the asset library and apply the package to the UAT environment first if applied successfully then apply to the production environment.


Please leave comments if you are facing any issue.


How to connect Power BI with Dynamics 365 for Finance and Operations

Below are the steps to connect Power BI with Microsoft Dynamics 365 for Finance and Operations


  1. Download and install the Power BI Desktop
  2. Sign in with the Licensed account
  3. In Power BI desktop ribbon click on Get Data
  4. Select OData Feed
  5. Enter the URL of the environment
  6. URL should be look like this https://operations.dynamics.com/data
  7. Enter the credentials of the user account in AX/D365. Organizational account account should be better rest base upon the requirement.
  8. Once everything done , next step is downloading the tables based on the security rights and privileges of the user.
  9. Now you can select the table from the list and start working on it for your workspace.


Follow the steps to connect and do let us know if you are facing any issue.

Report Name dynamic change -attachment file Thru print management – Ax2012 – Dynamics 365 for Finance and operations

Scenario: Sometime a requirement to change the report name in the email thru print management need to change dynamically.

Solution:

Class name where changes need to be done.

Report name update in the email

Class.Method: SRSReportRunPrinter.ToEmail()

check the report name in this method and update the file name as per requirement.


Report name update in the PDF and screen viewer

Class.Method: PrintMgmtReportRun.Execute()

  • check the report name
  • check the conditions for file and screen viewer
  • update the file name for file condition
  • update the file name and caption for the report


For Dynamics 365 for finance and operations use the post events of both methods


What’s new or changed in Dynamics Finance version 10.0.7 , – (January 2020)

Below are summary about the new update of Microsoft Dynamics Finance and Operations apps version 10.0.7

  1. Budget Register Entry Enhancements
  2. Ability to export records from the accounts payable invoice pool
  3. Ledger Settlements by User
  4. Forecast position reports(Public sector)
  5. Mark a Purchase agreement as closed
    • Users can now mark a Purchase agreement as “Closed” to signal the agreement is no longer actively used, making it so users will not be able to create release orders from the purchase agreement.
  6. Delayed Tax calculation on journal
  7. Reverse Journal posting
  8. Stop workflow submission when there are unallocated charges on a vendor invoice
  9. Account group selection for Chinese voucher types
  10. Sort resource in the project by invoice proposal
  11. Run Settle and post sales tax in batch mode
  12. Tax engine GTE (only available for India

For more details visit Microsoft Documentation using below link


Whats changed in 10.0.7

Entity Relationship – Common Data Service – CDS

Entity Relationships:

Entity relationships are metadata. Entity relationships define the different ways of entity records can be associated to different entity records from other entities or the same entity. Entity relationships allows the query to retrieve data efficiently.

Types of Entity relationships:

There are two types of entity relationships

One-to-many relationships:

Many related entity records associated with a single entity record (1:N) ,a parent/child relation.

Many-to-many relationships:

Many entity records are associated with many other entity records. A N to N( N:N) relation.

Entity relationship (1:N) do the following tasks, other than define the relations between the entities:

  • If record deleted on the parent entity then the record associated in the child entities also deleted.
  • When assign a record to a new owner, associated records also assign to the new owner.
  • How the record and related records will be visible to the users.


Previous Topic:

Entities – Common Data Service – CDS


Entities – Common Data Service – CDS

Entity:

Data is stored in the Common Data Service database is defined as entity. Entity corresponds to a database table and each field within an entity represents a column in that table.

Common Data service, metadata(data about data), is a collection of entities. Entity metadata controls the kinds of records you can create and type of actions performed on them. When we create or edit the entities,fields relationships, we are editing this metadata.

Common data service comes with a number of  standard entities that support the core business applications.We need to become familiar with the catalog of standard entities.

For minor changes we don’t need to create new custom entities:

  • To change the field display name or label we don’t need to create custom entity.
  • We cannot delete the standard entities but we can hide them by changing the security role assignment.


Previous Topic:

What is Common Data Service?

Next Topic:

Entity Relationship – Common Data Service – CDS

How delete a specific model/package? Uninstall deployable package. Microsoft Dynamics 365 for Finance and Operations

Sometimes we need to delete the model and deployable package from the dev environments.


Model Deletion:

use Modelutil.exe to delete the model file from the packages local directory.


Package installation or deletion:


  1. Stop IIS (kill the IIS worker process from the task manager)
  2. Stop batch job DynamicsAXBatch job
  3. Delete the package folder located on C:\ or K:\AosService\PackagesLocalDirectory (make sure folder completely deleted)
  4. Open VS Dynamics -> Model Management -> Refresh models


Failure! Status check of Report Server – The remote server returned an error: (500) Internal Server Error – Report design not found – Microsoft Dynamics 365 for Finance and Operations

Scenario:

Sometimes users facing below issue in generating the reports from Dynamics 365 for Finance and operations or Developers while deploying the reports 

  • Failure! Status check of Report Server –
  • The remote server returned an error: (500) Internal Server Error – Report design not found
  • Report design not found

Solution:

Restart the below services by going on the services list window of the report server or from the LCS

  • Restart the service report server
  • Check and restart the Microsoft SQL Server instance service

Note: If the server is sandbox environment managed by Microsoft then go the Power BI (report server) VM and restart the above services


What is Common Data Service? Common Data Service – CDS

Common Data Service allow you securely store and manage data that is used in the Business Applications. 

Data within common data service is stored within set of records called entities. An entity is a set of records used to store data, similar to how a table store data within the database.


platform


Entities – Common Data Service

Chain Of command – Forms – Dynamics 365 for Finance and Operations – X++

Chain of Command now supports the more scenarios for the extensions on forms:

Now you can wrap the methods on forms, Forms data sources, Datafields and on form control methods.

  1. Forms
  2. Form Data Sources
  3. Form Controls
  4. fields in data sources

Below is the complete example of Form Data source and just a code snippet for the rest. In below example we are updating the ratingmodel based on our custom logic that is global variable on the form.

Note: use element.FormToExtendVariable to access the form variables and datasources

Use element.FormToExtendMethod() to call the form methods

Screen Shot 2019-11-03 at 3.20.34 PM.png


  1. [ExtensionOf(FormStr(FormName))] // for form extension
  2. [ExtensionOf(FormControlStr(FormName,FormControl))] // for form control method extension
  3. [ExtensionOf(FormDataFieldStr(FormName,FormDataSource,DataField))] // for form datasource method extension
  4. [ExtensionOf(FormDataSource(FormName,FormDataSource) // for form data source extension

How to Extend form init(Pre or Post) Methods in D365FnO? – Microsoft Dynamics 365 for Finance and Operations – D365FnO – X++

Scenario: Sometimes you need to extend the form init method in Dynamics 365 for Finance and Operations.

Below is sample code to extend:

Code:


/// <summary>

    ///

    /// </summary>

    /// <param name=”args”></param>

    [PostHandlerFor(formStr(HcmRatingLevelIdLookUp), formMethodStr(HcmRatingLevelIdLookUp, init))]

    public static void HcmRatingLevelIdLookUp_Post_init(XppPrePostArgs args)

    {

        FormRun fr = args.getThis();

       //you have form run object to access the controls and datasources of form


    }