Unable to connect to Azure Storage )Local VM)- Dynamics 365 for Finance and Operations

Issue:

Unable to connect to the remote server at Microsoft.WindowsAzure.Storage.Core.Executor.Executor.ExecuteSync[T](RESTCommand`1 cmd, IRetryPolicy policy, OperationContext operationContext)at Microsoft.WindowsAzure.Storage.Table.CloudTable.Exists(Boolean primaryOnly, TableRequestOptions requestOptions, OperationContext operationContext) at Microsoft.WindowsAzure.Storage.Table.CloudTable.CreateIfNotExists(TableRequestOptions requestOptions, OperationContext operationContext) at Microsoft.DynamicsOnline.Infrastructure.Components.TableAccessor.TableStorageAccessor.PerformOperation(CloudStorageAccount storageAccount, String tableName, Func`1 operation) at Microsoft.DynamicsOnline.Infrastructure.Components.TableAccessor.TableStorageAccessor.AddRecord[T](CloudStorageAccount storageAccount, String tableName, T record) at

Reason:

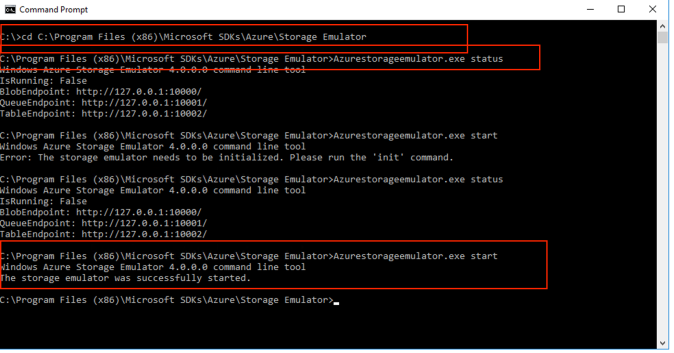
This issue is coming because Azure emulator is not running.

Resolution:

Issue can be checked and resolved using below commands.

Screen Shot 2019-09-30 at 6.57.04 PM

Get Next Number sequence thru code X++ – Microsoft Dynamics 365 For Finance and Operations

Scenario: Normally next number sequence is created when new record create from the front end but sometimes we need to create next number sequence from code when importing the records thru code

Solution: Below code will be used to get next number sequence


NumberSeq::newGetNum(Number Sequence reference as parameter).num();

Parameters details:

NumberSequenceReference _numberSequenceReference, mandatory

        boolean                 _makeDecisionLater          = false, optional

        boolean                 _dontThrowOnMissingRefSetUp = false optional

        //<GEERU><GEEU>

        ,UnknownNoYes            _allowManual                = UnknownNoYes::Unknown optional

File locked in another workspace – Team Foundation server , DevOps

Scenario: sometimes items are locked in abandoned workspaces in Team foundation server, DevOps

Solution: In this case you need to remove the abandoned workpsaces from the DevOps server/Collections and below are the steps to resolve

  1. Run the command prompt on visual studio server ‘Developer command prompt for VS2015’
  2. Run the below command “tf workspaces /computer:* /owner:*” to check the workspaces and owner user ids
  3. if you find the workspace present in the list
  4. Then log in with the same user in the team services and click on manage workspaces
  5. click on remote workspaces
  6. Remove the workspace that locked the items (It will unlock all the locked items)

Screen Shot 2019-09-24 at 6.00.03 PM.png


Simple Dialog using X++ – Dynamics 365 for Finance and Operations

Scenario: Sometimes we need a simple dialog having some fields and we do not want to use dialog form ,instead of that we can create dialog thru X++ code.

Below is the code you can use to create simple dialog.

Example Code:


//Declare dialog variables        
Dialog                  dialog;        
DialogField             fieldfDate, fieldtDate;        
FromDate                _fromDate, _toDate;        
;        

dialog = new Dialog("Select start and end date");       

//define fields to show on the dialog       
fieldfDate = dialog.addField(extendedTypeStr(TransDate));        
fieldtDate = dialog.addField(extendedTypeStr(TransDate));               
dialog.run();        

if (dialog.closedOk())        
{
      //get values from the dialog fields
      _fromDate = fieldfDate.value();
      _toDate = fieldtDate.value();   
}

Cloud Computing Services – Cloud Computing

There are two most common cloud services

  1. Computer Power
  2. Storage

Computer Power:

There operations speed performed on any machine (sending an email, processing some application data etc) depend on the computer power of the machine. The power required to perform operations on the cloud are reffered to as a compute power.

Two popular options in the computing services

  • Containers
  • Serverless computing

What are containers?

Containers provide a consistent, isolated execution environment for applications. They’re similar to VMs except they don’t require a guest operating system. Instead, the application and all its dependencies is packaged into a “container” and then a standard runtime environment is used to execute the app. This allows the container to start up in just a few seconds because there’s no OS to boot and initialize. You only need the app to launch.

The open-source project, Docker, is one of the leading platforms for managing containers. Docker containers provide an efficient, lightweight approach to application deployment because they allow different components of the application to be deployed independently into different containers. Multiple containers can be run on a single machine, and containers can be moved between machines. The portability of the container makes it easy for applications to be deployed in multiple environments, either on-premises or in the cloud, often with no changes to the application.

What is serverless computing?

Serverless computing lets you run application code without creating, configuring, or maintaining a server. The core idea is that your application is broken into separate functions that run when triggered by some action. This is ideal for automated tasks – for example, you can build a serverless process that automatically sends an email confirmation after a customer makes an online purchase.

The serverless model differs from VMs and containers in that you only pay for the processing time used by each function as it executes. VMs and containers are charged while they’re running – even if the applications on them are idle. This architecture doesn’t work for every app – but when the app logic can be separated to independent units, you can test them separately, update them separately, and launch them in microseconds, making this approach the fastest option for deployment.

Here’s a diagram comparing the three compute approaches we’ve covered.


2-vm-vs-container-vs-serverless.png


Storage

Most devices and applications read and/or write data. Here are some examples:

  • Buying a movie ticket online
  • Looking up the price of an online item
  • Taking a picture
  • Sending an email
  • Leaving a voicemail

In all of these cases, data is either read (looking up a price) or written (taking a picture). The type of data and how it’s stored can be different in each of these cases.

Storage gauge

Cloud providers typically offer services that can handle all of these types of data. For example, if you wanted to store text or a movie clip, you could use a file on disk. If you had a set of relationships such as an address book, you could take a more structured approach like using a database.

The advantage to using cloud-based data storage is you can scale to meet your needs. If you find that you need more space to store your movie clips, you can pay a little more and add to your available space. In some cases, the storage can even expand and contract automatically – so you pay for exactly what you need at any given point in time.

Summary

Every business has different needs and requirements. Cloud computing is flexible and cost-efficient, which can be beneficial to every business, whether it’s a small start-up or a large enterprise.

Introduction to Form Patterns – Dynamics 365 for Finance and Operations

Form Patterns are introduced in Dynamics 365 for Finance and Operations, In Dynamics AX2012 we used form styles. These Patterns provide a base structure based on particular style (including required and optional controls), and also provide many default control properties. Patterns have made the form development very easier and after applying the pattern its validate and give the gurantee to the developers that its correct and consistant.

Patterns help validate form and control structures, and also use of control in some places.Form patterns provide many default control properties, and these also contribute to a more guided development experience.

List of Top Level Form Patterns

Form pattern What it’s used for
Details Master (two variants) A form that displays the details of a complex entity
Details Transaction A form that displays the details of a complex transaction entity and its lines (for example, and order and its lines)
Dialog (six variants) A form that is used as a dialog to gather a set of information
Drop Dialog (two variants) A form that is used as a drop dialog to gather a small set of information to provide context for an action
FactBox (two variants) A Microsoft Dynamics AX 2012 FactBox that displays information about a related record or set of records
List Page A Dynamics AX 2012 List Page
Lookup (three variants) A form that is used as a lookup
Simple Details (four variants) A form that is focused on a single record
Simple List A form that displays details for a simple entity as a grid that has fewer than 10 fields per record
Simple List & Details (three variants) A form that displays information about an entity of medium complexity
Table of Contents A form that displays setup information or loosely related information sets
Task (two variants) A legacy form pattern that is used to display master or transaction entities
Wizard A form that displays a set of tab pages to the user to gather information in a predetermined order
Operational Workspace A form that is used to display an overview of an activity and is meant to be a primary means of navigation
Workspace Panorama Sections (three variants) A form that is used to show content for a panorama section (via a Form Part Control) in the Operational Workspace


This is just an introduction of the form patterns will describe each pattern in details in separate post.

What is Cloud Computing? – Cloud Computing – Part 1

Basic understanding Cloud Computing

Cloud computing is renting resources, like storage space or cpu cycles on another company computer.

Companies that provided cloud services are reffered to as a cloud providers for exampleGoogle, Amazon and Microsoft.

Cloud providers are responsible for Physical hardware that require to execute the work.

Typical services provide by cloud providers:


Compute power: such as servers and web applciation

Storage: Such as databases and files

Networking: Secure connections between cloud providers and your company

Analytics: Visual representation of perfomrnace and telemetry data

The database could not be exclusively locked to perform the operation.(Renaming the SQL Server Database) Microsoft SQL Server

Scenario: Sometimes during renaming the Microsoft SQL Server database you might see the error, “The database could not be exclusively locked to perform the operation.Microsoft SQL Server, Error: 5030)” . 

Reason: This error occurs when the database normally in the Multi User mode.

Resolution: Run the below commands to resolve the above issue

Alter the Database to single user mode

ALTER DATABASE dbname

SET SINGLE_USER WITH ROLLBACK IMMEDIATE

Rename the Database

ALTER DATABASE dbname MODIFY NAME = newdbName

Alter the database to multi user mode

ALTER DATABASE newdbName

SET MULTI_USER WITH ROLLBACK IMMEDIATE

Export Database from UAT Environment and restore in the Dev Environment – Restore the database in the local Dev VM – Microsoft Dynamics 365 for Finance and Operations

Scenario : During testing we face many problems and those problem can only find by debugging the code with the actual data. Then we need to take the backup of the UAT environment and restore it to the development environment.

Solution : Below are the steps needs to perform to take the backup and restore

Export the Database:

  1. Go to LCS
  2. From sandbox Environment Details page, click the Maintain menu, and then select Move database.
  3. Select the Export Database option
  4. Database will exported as bacpac file to the Database backup option in the Asset Library

Import the Database:

  1. Copy the bacpac file to the Development enviornment
  2. Import as a data tier application
  3. If data tier application failed then import using below commands
  4. cd C:\Program Files (x86)\Microsoft SQL Server\140\DAC\bin
    SqlPackage.exe /a:import /sf:D:\Exportedbacpac\uatBackup.bacpac /tsn:localhost /tdn:SSProd /p:CommandTimeout=1200


    • tsn (target server name) – The name of the SQL Server to import into.
    • tdn (target database name) – The name of the database to import into. The database should not already exist.
    • sf (source file) – The path and name of the file to import from.

Screen Shot 2019-11-28 at 9.36.40 AM.png

  1. After successfully database import run below commands to update the database logins details as per current environment (at the end of the article) (No need to run this command if the current environment is local dev vm not Microsoft managed)
  2. Run the retrovision tool to use the new database
  3. Stop the services
    1. World wide web publishing service
    2. Batch Management service
    3. Management reporter service
  4. rename the database as AxDB after stopping the service and rename the old one as AxDBOld
    1. REATE USER axdeployuser FROM LOGIN axdeployuser
      EXEC sp_addrolemember 'db_owner', 'axdeployuser'
      
      CREATE USER axdbadmin FROM LOGIN axdbadmin
      EXEC sp_addrolemember 'db_owner', 'axdbadmin'
      
      CREATE USER axmrruntimeuser FROM LOGIN axmrruntimeuser
      EXEC sp_addrolemember 'db_datareader', 'axmrruntimeuser'
      EXEC sp_addrolemember 'db_datawriter', 'axmrruntimeuser'
      
      CREATE USER axretaildatasyncuser FROM LOGIN axretaildatasyncuser
      EXEC sp_addrolemember 'DataSyncUsersRole', 'axretaildatasyncuser'
      
      CREATE USER axretailruntimeuser FROM LOGIN axretailruntimeuser
      EXEC sp_addrolemember 'UsersRole', 'axretailruntimeuser'
      EXEC sp_addrolemember 'ReportUsersRole', 'axretailruntimeuser'
      
      CREATE USER axdeployextuser WITH PASSWORD = '<password from LCS>'
      EXEC sp_addrolemember 'DeployExtensibilityRole', 'axdeployextuser'
      
      CREATE USER [NT AUTHORITY\NETWORK SERVICE] FROM LOGIN [NT AUTHORITY\NETWORK SERVICE]
      EXEC sp_addrolemember 'db_owner', 'NT AUTHORITY\NETWORK SERVICE'
      
      UPDATE T1
      SET T1.storageproviderid = 0
       , T1.accessinformation = ''
       , T1.modifiedby = 'Admin'
       , T1.modifieddatetime = getdate()
      FROM docuvalue T1
      WHERE T1.storageproviderid = 1 --Azure storage
      
      ALTER DATABASE [<your AX database name>] SET CHANGE_TRACKING = ON (CHANGE_RETENTION = 6 DAYS, AUTO_CLEANUP = ON)
      GO
      -- Begin Refresh Retail FullText Catalogs
      DECLARE @RFTXNAME NVARCHAR(MAX);
      DECLARE @RFTXSQL NVARCHAR(MAX);
      DECLARE retail_ftx CURSOR FOR
      SELECT OBJECT_SCHEMA_NAME(object_id) + '.' + OBJECT_NAME(object_id) fullname FROM SYS.FULLTEXT_INDEXES
       WHERE FULLTEXT_CATALOG_ID = (SELECT TOP 1 FULLTEXT_CATALOG_ID FROM SYS.FULLTEXT_CATALOGS WHERE NAME = 'COMMERCEFULLTEXTCATALOG');
      OPEN retail_ftx;
      FETCH NEXT FROM retail_ftx INTO @RFTXNAME;
      
      BEGIN TRY
       WHILE @@FETCH_STATUS = 0 
       BEGIN 
       PRINT 'Refreshing Full Text Index ' + @RFTXNAME;
       EXEC SP_FULLTEXT_TABLE @RFTXNAME, 'activate';
       SET @RFTXSQL = 'ALTER FULLTEXT INDEX ON ' + @RFTXNAME + ' START FULL POPULATION';
       EXEC SP_EXECUTESQL @RFTXSQL;
       FETCH NEXT FROM retail_ftx INTO @RFTXNAME;
       END
      END TRY
      BEGIN CATCH
       PRINT error_message()
      END CATCH
      
      CLOSE retail_ftx; 
      DEALLOCATE retail_ftx; 
      -- End Refresh Retail FullText Catalog

Shrink Log File – Microsoft SQL Server

Scenario: Sometimes Microsoft SQL server database log file size is huge. Then, it needs to reduce to custom limit


Solution: Use below code to reduce the log file size to specific limit


USE AdventureWorks;

GO

— Truncate the log by changing the database recovery model to SIMPLE.

ALTER DATABASE AdventureWorks

SET RECOVERY SIMPLE; 

GO

— Shrink the truncated log file to 1 MB.

DBCC SHRINKFILE (AdventureWorks_log, 10);

GO

— Reset the database recovery model.

ALTER DATABASE AdventureWorks

SET RECOVERY FULL; 

GO


Landing page or Initial Page preference change in Dynamics 365 for Finance and operations

Scenario: Sometimes users dont want to see the dashboard or workspace whenever they login to dynamics 365 for finance and operations. They want to directly go to Employee self service(for employees) or system administration (for administrators) page.

Solution:  Below screenshots will show how you can set this option for any employee.

  1. Go to users options on the top right.
  2. Click on preference tab on the left side
  3. select the initial page for the user

Screen Shot 2019-09-12 at 12.01.18 PM.png


Screen Shot 2019-09-12 at 12.05.05 PM.png


Read Data from Excel file – Dynamics 365 for Finance and Operations – Excel Operations X++

Scenario : upload/Import the data using excel

Solution: Below is the code snippet to use for the data upload using excel

Note: SysExcel classes has been depreciated in the dynamics 365

Microsoft office interop reference is used in the dynamics 365. You can find that in the reference node of solution explorer.


Code :


using System.IO;

using OfficeOpenXml;

using OfficeOpenXml.ExcelPackage;

using OfficeOpenXml.ExcelRange;

class BEUploadExcel

{

    /// <summary>

    /// Runs the class with the specified arguments.

    /// </summary>

    /// <param name = “_args”>The specified arguments.</param>

    public static void main(Args _args)

    {


        System.IO.Stream            stream;


        FileUploadBuild             fileUploadBuild;

        DialogGroup                 dialogUploadGroup;

        FormBuildControl            formBuildControl;

        Dialog                      dialog = new Dialog(‘Import the data from the Excel’);

        dialogUploadGroup          = dialog.addGroup(‘@SYS54759’);

        formBuildControl        = dialog.formBuildDesign().control(dialogUploadGroup.name());

        fileUploadBuild         = formBuildControl.addControlEx(classstr(FileUpload), ‘Upload’);

        fileUploadBuild.style(FileUploadStyle::MinimalWithFilename);

        fileUploadBuild.fileTypesAccepted(‘.xlsx’);

        if (dialog.run() && dialog.closedOk())

        {

            Fileupload fileUploadControl     = dialog.formRun().control(dialog.formRun().controlId(‘Upload’));

            FileUploadTemporaryStorageResult fileUploadResult = fileUploadControl.getFileUploadResult();

            if (fileUploadResult != null && fileUploadResult.getUploadStatus())

            {

                stream = fileUploadResult.openResult();

                using (ExcelPackage ePackage = new ExcelPackage(stream))

                {

                    int                         rowCount, i;

                    ePackage.Load(stream);

                    ExcelWorksheet  eWorksheet   = ePackage.get_Workbook().get_Worksheets().get_Item(1);

                    OfficeOpenXml.ExcelRange    eRange       = eWorksheet.Cells;

                    rowCount                  = eWorksheet.Dimension.End.Row – eWorksheet.Dimension.Start.Row + 1;

                    for (i = 2; i<= rowCount; i++)

                    {

                        info(eRange.get_Item(i, 1).value);

                        info(eRange.get_Item(i, 2).value);

                    }

                }

            }

            else

            {

               throw error(‘Error here’);

            }

        }

    }

}

Models Export and Import: Dynamics 365 for Finace and Operations

Scenario:

Export model from one dev environment to another dev enviornment

Steps to perform:

  1. Export model from enviornment using command prompt
  2. Import Model in another enviornment using command prompt
  3. Resolve conflicts
  4. Complete build of models and Synchonization of Database


Export Model:

Export the model using utilily name ModelUtil.exe located in the below path

K:\AosService\PackagesLocalDirectory\Bin

K:\ Drive can be varrried for local VM C:\ or J:\ 

Command:

ModelUtil.exe -export -metadatastorepath= [path of the metadata 
store] -modelname=[name of the model to export] -outputpath=[path 
of folder where model file should be saved]


Example:

ModelUtil.exe -export -metadatastorepath= K:\AosService\PackagesLocalDirectory -modelname=D365FnOModel -outputpath=C:\Users\Userf3d496631\Desktop\US\devmodelsbackup

Screen Shot 2019-09-08 at 4.47.49 PM


Import model:

To install or import a model file use below code

ModelUtil.exe -import -metadatastorepath=[path of the metadata store 
where model should be imported] -file=[full path of the file to 
import]

Example:

ModelUtil.exe -Import -metadatastorepath= K:\AosService\PackagesLocalDirectory -file=C:\Users\Userf3d46296631\Desktop\US\devmodelsbackup\D365FnOModel

Screen Shot 2019-09-08 at 4.59.11 PM.png


Delete a Model:

If model already exists in the destination environment. Delete the model using modelutility.exe

ModelUtil.exe -delete -metadatastorepath=[path of the metadata store]
 -modelname=[name of the model to delete]

Example:

ModelUtil.exe -Delete -metadatastorepath= K:\AosService\PackagesLocalDirectory -modelName=D365FnOModel

Screen Shot 2019-09-08 at 5.02.35 PM.png


Resolve the conflicts after importing:


Screen Shot 2019-09-08 at 5.04.05 PM.png


Build and sycnhronize:

after resolving all the conlicts build the model(all models would be better but it will take long time) and synchronize the database


Single deployable package creation from customization and ISV package – Microsoft Dynamics 365 for Finance and operations

Upgrade Dynamics 365 Finance and operations environment – Third-Party ISVs(No Source code) and custom model(source code)

Scenario:

2 ISV packages(no source code)

2 Custom models(source)

Sandbox Environment is on Application release 8.0 and PU 24

Target version for sandbox environment Application release 10.0.4 and PU 28

The problem in the simple upgrade:

unable to merge 4 packages(2 ISVs, 1 custom model and 1 application release 10.0.4 ,PU28 package)

Maximum only 2 packages can be merged in the asset library.

Solution:

To create one package for ISVs and custom model, need build environment and code should be under source control

Then one package of latest application release and custom package can be merged into one package and apply to a sandbox environment to upgrade


Steps:

  1. Custom models source code add to source control
    1. After you install the custom model, follow these steps to add the new model to source control.
    2. Open Source Control Explorer by clicking View > Other Windows > Source Control Explorer.
    3. Navigate to the metadata folder that is mapped on this development VM, such as MyProject/Trunk/Main/Metadata.
    4. In the metadata folder, find the folder for the package that contains the new model. Right-click the package folder, and then click Add Items to Folder.
    5. In the Add to Source Control dialog box, select the Descriptor folder and the folder that has the name of the model. Some models may also contain referenced DLLs in the bin folder. If these exist you’ll need to also include the appropriate DLL files from the bin folder. Once all files have been selected, click Next.
    6. Review the items that will be added, and then, when you’re ready, click Finish.
    7. Open the Pending Changes window from the Team Explorer pane or by clicking View > Other Windows > Pending Changes.
    8. Review the changes, enter a check-in comment, and then click Check In.
  2. Add ISVs package to source control follow below steps
    1. After you install the deployable package on a development VM, follow these steps to add the package to the source control.
    2. Open Source Control Explorer by clicking View > Other Windows > Source Control Explorer.
    3. Navigate to the metadata folder that is mapped on this development VM, such as MyProject/Trunk/Main/Metadata.
    4. Right-click the Metadata folder, and then click Add Items to Folder.
    5. In the Add to Source Control dialog, double-click the folder that has the package name that you want to add to source control.
    6. Select all the folders except XppMetadata and Descriptor, if they exist, and then click Next.
    7. On the next page, on the Excluded items tab, select all files by clicking one of the files and then pressing Ctrl+A. At the bottom of the selection window, click Include item(s). When you’re ready, click Finish.
    8. Open the Pending Changes window from the Team Explorer pane or by clicking View > Other Windows > Pending Changes.
    9. Review the changes, enter a check-in comment, and then click Check-In.
  3. Deploy build environment
    1. During deployment, Build Agent Name keep the same as the build environment name
    2.  Branch Name should be a source control branch name of the project
  4. Use DevOps pipeline to create one package
    1. Click on Pipeline -> pipeline and then click on run pipelineScreen Shot 2019-09-05 at 10.52.56 AM.png
    2. Screen Shot 2019-09-05 at 10.54.29 AM.png
  5. Once pipeline is completed the one deployable package will be created on the build VM.
  6. Upload the build package on the Asset library, validate
  7. Apply on the UAT environment and production as well if all goes well.


Please comment if you need any clarification or you are facing some issue on any step.

Database Maintenance – September 2019 -Microsoft Dynamics 365 for Finance and Operations

Microsoft Dynamics 365 for finance and operations performing database maintaince in Septemebr 2019 and he sent emails to project owners and Environement managers.

Below are key points of the September database maintenance

  1. Database scale out and migrations
    • Result regions changed for new and existing customers
    • Connection string will be updated for existing customer
  2. Restricting Database access
    • After this update only Project owners and Environment managers can access the database backup option
  3. Enable customers with Expired ax2012 license to take ownership of their projects on LCS
  4. Soft enforecment added for the use of single deployable package for customizations and isv packages
    • Soft enforcement for now and hard enforcement in future release


To check in more details, please use below link of microsoft llife services blog

Lifecycle service blog